Installation and Upgrade
Installation and Upgrade
Before installing Alyvix, first check that your environment meets the system requirements. If it does, you will then need to install Python on your Windows machine before installing Alyvix itself.
System Requirements
Note
Alyvix assumes that you have one virtual or physical machine exclusively dedicated to running Alyvix test cases.
You should check that your designated machine and the account on that machine meet the following requirements before you install Alyvix:
Minimum |
|
|
Windows 10 (64-bit) Pro or Enterprise -or- Windows Server 2016, 2019 or 2022 (32-bit versions of Windows are not compatible with Alyvix) |
|
2 CPUs |
|
4GB RAM |
|
24-bit RGB or 32-bit RGBA screen color depth |
|
Users defined on Alyvix Server must have the proper permissions to run and interact with the application interface being monitored |
Versions
Alyvix Version |
Python Version Required |
Install command |
Alyvix 3.7.1 |
|
|
Alyvix 3.7.0 |
|
|
Alyvix 3.6.0 |
|
|
Alyvix 3.5.0 |
|
|
Alyvix 3.4.0 |
|
|
Alyvix 3.3.2 |
|
|
Alyvix 3.3.1 |
|
|
Alyvix 3.2.3 |
|
|
Alyvix 3.2.0 |
|
|
Alyvix 3.1.6 |
|
Installing Python
Follow this procedure to install Python on your system:
Download the 64-bit Windows installer for Python version 3.9.7. Note that Alyvix is not compatible with 32-bit versions of Python.
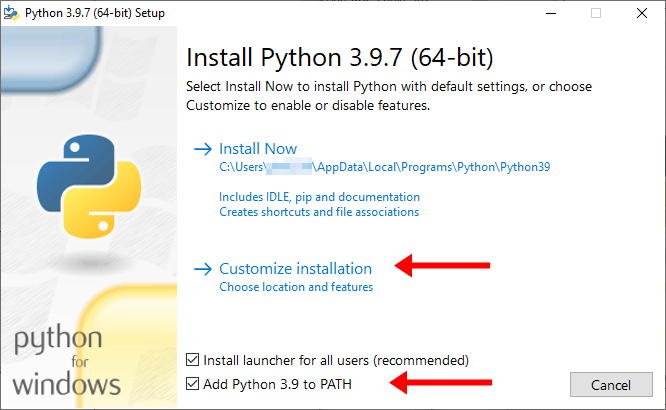
Start the installation:
Right-click on the downloaded executable and select “Run as administrator”
Check the box “Add Python 3.9 to PATH” at the bottom
Choose the option “Customize installation”
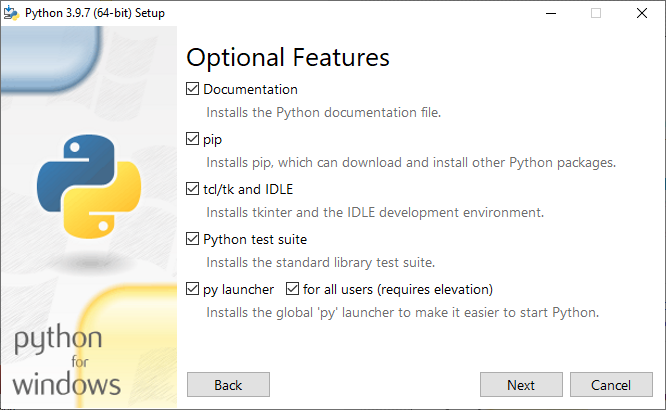
On the second panel all the option boxes should already be checked. Click “Next” to continue.
On the third panel, make sure the advanced options are set as shown below. Then under “Customize install location”, insert the recommended location
C:\Python39\. Finally, click on “Install”. At this point Python will begin installing, typically requiring about 5 minutes.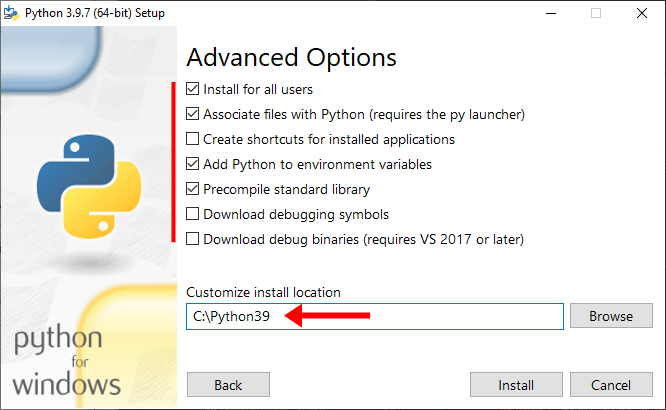
The installation is correct if the following command returns a version number rather than an error message (if not, you will need to edit your
Pathenvironment variable):C:\> python --version Python 3.9.7
Installing Alyvix
Alyvix itself is installed via
pip, the official Python package manager.
pip will
automatically detect that your system is running Python 3 and will install Alyvix 3,
placing all executables in the directory
C:\Python39\Lib\site-packages\alyvix\.
The Alyvix installer is launched from the command prompt that, like the Python installer, must be started in Adminstrator mode. Only this single step is required:
Run the following command to download and install the latest Alyvix master release along with all of its dependencies:
C:\> pip install alyvixIf necessary, you can install Alyvix through a proxy by adding a parameter:
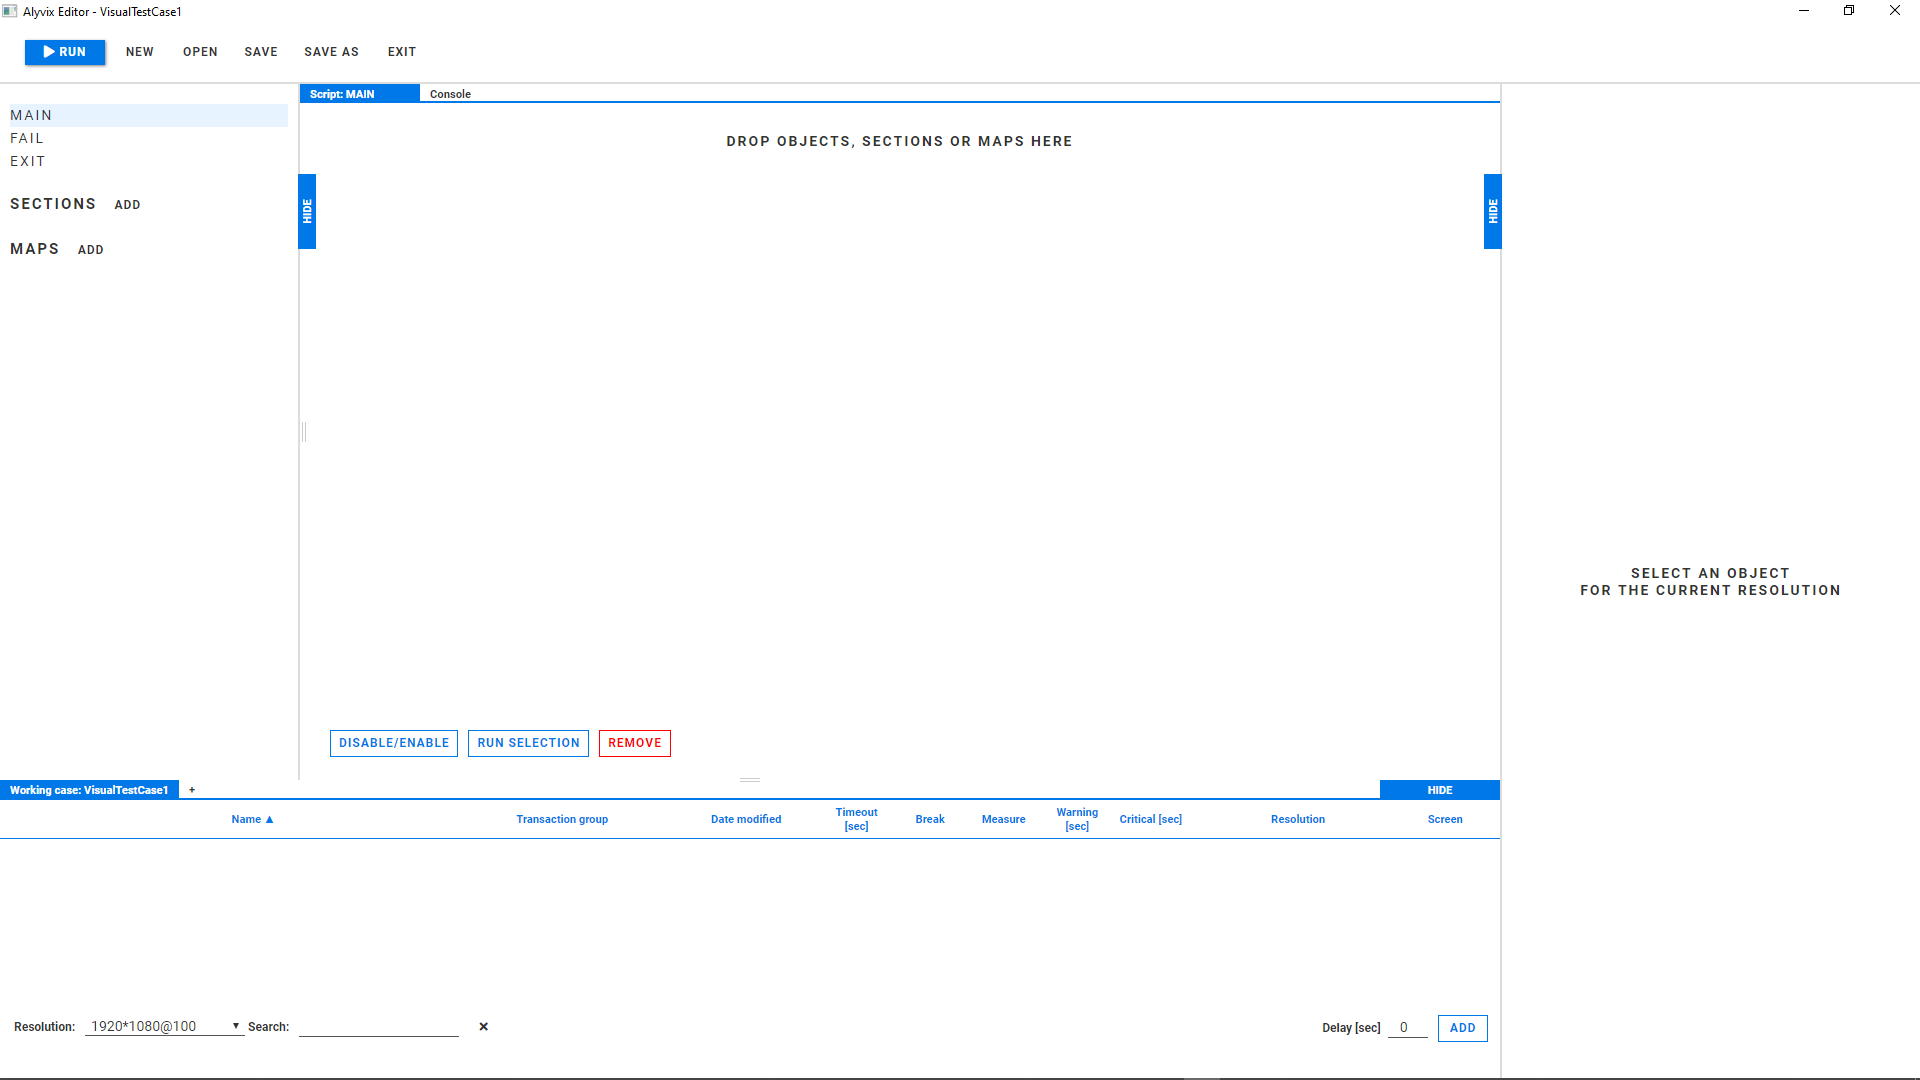
C:\> pip install --proxy=https://[user:password@]proxyserver:port alyvixCheck that the installation concluded successfully. Run the following command:
C:\> alyvix_editorIf the Alyvix Editor window appears as shown here, then everything is working properly.
We recommend you place your Alyvix test cases in a separate data directory reserved for test cases,
such as C:\Alyvix\Testcases\.
Upgrading Alyvix
Only two steps are needed to upgrade to the latest version:
Close Alyvix
Save all of your currently open projects
Close all Alyvix user interfaces and applications
Terminate all running Alyvix processes
Upgrade Alyvix with pip
Start a Command Prompt in administrator mode
Follow the case below that corresponds to your situation in order to download and upgrade to the latest Alyvix master release along with all of its dependencies:
If you have Python 3.7.9 installed, uninstall it, then manually remove its containing folder (e.g.,
C:\Python37\) and re-install Alyvix with pip as shown in the section Installing Alyvix above.If you have Python 3.9.7 installed, then you can use the pip –upgrade command:
C:\> pip install --upgrade alyvix
Offline Installation
In order to create an offline installation, you will need two machines:
An internet-connected installer machine with a working Python 3 installation to serve as a source for downloading the required software packages
A second target machine that will serve as the offline probe
The following steps will then enable you to install Alyvix on the target machine:
On the installer Windows 64-bit machine with an existing Python 3 installation:
Create a new directory with appropriate permissions
Download the 64-bit Windows installer for Python version 3.9.7 to that directory
Download the Alyvix application and its dependencies with this command:
C:\...\MyFolder> pip download alyvix
Copy the entire directory onto the target machine
Use the Python installer now on the target machine to install Python following the instructions above
Open a command prompt in the directory on the target machine and install Alyvix with this command:
C:\...\MyFolder> pip install alyvix-3.2.0-cp39-cp39-win_amd64.whl --no-index --find-links .Check that the installation was successful by starting Alyvix Editor:
C:\> alyvix_editorIf the Editor window appears, the installation was successful.
Uninstalling Alyvix and Python
To uninstall Alyvix, regardless of whether you also want to uninstall Python, run the following command in a Command Prompt or Power Shell with Administrator privileges:
C:\> pip uninstall alyvix
Pip will list the packages to be removed, and then ask for confirmation.
If you only use Python to run Alyvix, you can now also remove Python itself. Go to
Start Menu > Windows Settings > Apps, scroll down, and remove both Python 3.9.7 (64-bit) and
Python Launcher. The process may take up to 5 minutes.
Once completed, you can also manually remove the C:\Python39\ directory (or whichever
directory you specified during installation) and either archive or delete your test case
directory.
The Python installer does not remove environment variables, so if desired you can manually remove them at System Properties > Environment Variables > System Variables > Path.
Installation Troubleshooting
Below are some potential installation problems and their solutions.
“Python” command does nothing or launches Microsoft Store on Windows 10
This error occurs when during installation steps #2 and #4 you forgot to check the boxes to add Python to the path and environment variables. Typing the python command in the command prompt under this condition will launch Microsoft Store in an attempt to install it that way.
To correct this situation you will need to either (1) uninstall and then reinstall Python, or (2) manually add the appropriate paths in the System Properties > Environment Variables panel.
“ImportError: DLL load failed” — Failure to Import Tesseract OCR
This error is caused by a missing dependency of the Tesseract OCR module, which requires that the
file vcomp140.dll be present in Windows during installation by
pip:
File "C:\Python39\lib\site-packages\alyvix\core\tesserocr\__init__.py", line 1, in <module> from ._tesserocr import *
ImportError: DLL load failed: The specified module could not be found.
You can fix this problem by installing the Microsoft Visual C++ Redistributable for Visual Studio, which contains the required file. It’s available at https://aka.ms/vs/16/release/vc_redist.x64.exe .
“WindowsError: [Error 206] The filename or extension is too long”
This error is caused by Python’s pip command attempting to write temporary files using a very long, automatically generated, unique path name.
WindowsError: [Error 206] The filename or extension is too long: <path/file>
You can fix this problem by editing the Windows setting that allows file paths longer than 260 characters. Open the Group Policy editor (GPEDIT.MSC) and navigate to Computer Configuration > Administrative Templates > System > Filesystem. At the right, double click on Enable Win32 long paths, then in the popup panel click on the “Enabled” setting. Click on Apply and OK, then you’ll need to restart your computer or VM.